Description: Initial positioning, power connection and projection distances for your first movie night.
Question:
How do I set up the projector and choose the screen size?
Answer:
Model reference: PJ-THHW2W-268
Applies to: PJ-THHW2W-268
If your SKU differs, search our support page by your Model SKU to find the correct article.
For the Laser Portable Wi-Fi LED Projector, follow these setup steps:
1. Remove all packaging and place the projector on a flat, stable surface with space around the vents.
2. Insert two AAA batteries into the remote control. They are listed as additional setup items, not box inclusions.
3. Connect the supplied AC power cord to the projector and a wall outlet. Do not route the cord across an air vent.
4. Press the Power button on the projector or remote, then wait for the Home screen.
5. Aim the lens at a suitable wall or projection surface and adjust focus.
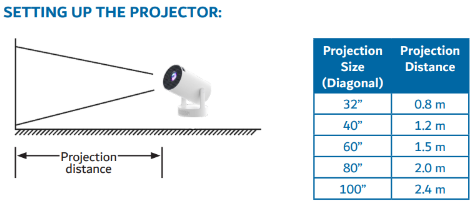
The manual gives these approximate image sizes and distances: 32 inches at 0.8 m; 40 inches at 1.2 m; 60 inches at 1.5 m; 80 inches at 2.0 m; and 100 inches at 2.4 m.
Keep the projector dry and do not block its air vents.
Was this article helpful?
That’s Great!
Thank you for your feedback
Sorry! We couldn't be helpful
Thank you for your feedback
Feedback sent
We appreciate your effort and will try to fix the article