This guide applies to:
- GA-21CSSW-273
- SP-21CSSW-112
- SP-P21CSW-303
Bluetooth name:
- 21CS
What’s in the box
The package includes:
- Gaming soundbar
- Wired subwoofer
- RGB light bar x2
- AC power adaptor
- Remote control
- USB-A to USB-A cable
- User manual
You may also need:
- 2 x AAA batteries
- HDMI cable
Quick setup
Follow these steps to get started:
- Insert 2 x AAA batteries into the remote.
- Connect the LED light bars to the left and right light ports.
- Plug the subwoofer cable into the SUB port.
- Connect the soundbar to your TV using an HDMI cable from the TV’s HDMI ARC port to the soundbar’s HDMI ARC port.
- If you want to use it with a PC, connect the included USB-A to USB-A cable from your PC to the soundbar’s USB (USB) port.
- Plug the power adaptor into the soundbar and then into a wall outlet.
- Turn the soundbar on using the power button on the unit or remote.
- Press INPUT on the remote and select the correct source.
Input modes
The soundbar supports these input modes:
- BT - Bluetooth
- PC - USB connection to a PC
- ARC - HDMI ARC from a TV
- AUX - 3.5mm audio input
- USB - USB media playback
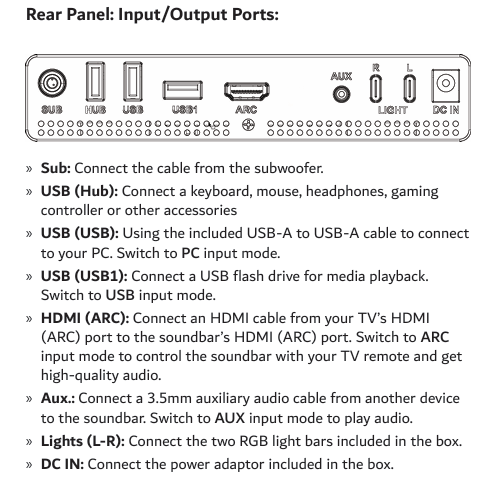
Rear ports and what they do
The rear panel includes:
- SUB - connects the wired subwoofer
- USB (Hub) - for accessories such as a keyboard, mouse, headphones, gaming controller, or similar accessories
- USB (USB) - connects to a PC using the included USB-A to USB-A cable
- USB (USB1) - connects a USB flash drive for media playback
- HDMI (ARC) - connects to your TV’s HDMI ARC port
- AUX - connects a 3.5mm auxiliary audio cable
- Lights (L-R) - connects the two RGB light bars
- DC IN - power input for the included adaptor
How to listen from your TV
To hear audio from your TV through the soundbar:
- Connect the soundbar to the TV’s HDMI ARC port.
- On the TV, select the correct source input.
- On the soundbar remote, switch to ARC mode.
- If there is still no sound, check your TV’s ARC, CEC, and PCM settings.
TV settings for ARC, CEC and PCM
If ARC audio is not working, check the following settings on your TV.
Samsung
- Go to Settings > General > External Device Manager
- Turn Anynet+ (HDMI-CEC) on
- Go to Settings > Sound > Sound Output
- Choose HDMI (ARC)
- Go to Sound > Expert Settings
- Set Digital Audio Output to PCM
LG
- Go to Settings > All Settings > General
- Turn SimpLink (HDMI-CEC) on
- Go to Sound > Sound Out
- Choose HDMI (ARC)
- Go to Sound > Advanced Settings
- Set Digital Sound Out to PCM
Hisense
- Go to Settings > System > HDMI and CEC Functions
- Turn HDMI-CEC on
- Go to Sound > Audio Output
- Select ARC
- Go to Sound > Advanced Audio
- Set Digital Audio Out to PCM
How to connect to a PC
To use the soundbar with a PC:
- Connect the included USB-A to USB-A cable from your PC to the USB (USB) port on the soundbar.
- Turn on your PC.
- Switch the soundbar to PC mode.
No drivers or software installation are required.
How to pair Bluetooth
To connect a phone, tablet, or other Bluetooth device:
- Press INPUT and switch to BT mode.
- On your device, open Bluetooth settings.
- Search for 21CS.
- Select it to connect.
- If asked for a password or PIN, enter 0000.
USB media playback
To play media from a USB drive:
- Connect the USB flash drive to USB (USB1).
- Switch the soundbar to USB mode.
- Use the remote or onboard controls to play, pause, and skip tracks.
Display meanings
The front display can show the following:
- bt - Bluetooth mode
- USb - USB media playback mode
- AUX - Aux input mode
- PC - PC input mode
- Arc - HDMI ARC input mode
- C1 to C7 - colour effects
- b-3 to b03 - bass level from -3 to +3
- t-3 to t03 - treble level from -3 to +3
- 0 to 32 - volume level
- E9 1 - Music mode
- E9 2 - Movie mode
- E9 3 - Game mode
- F1 to F3 / OFF - music rhythm mode
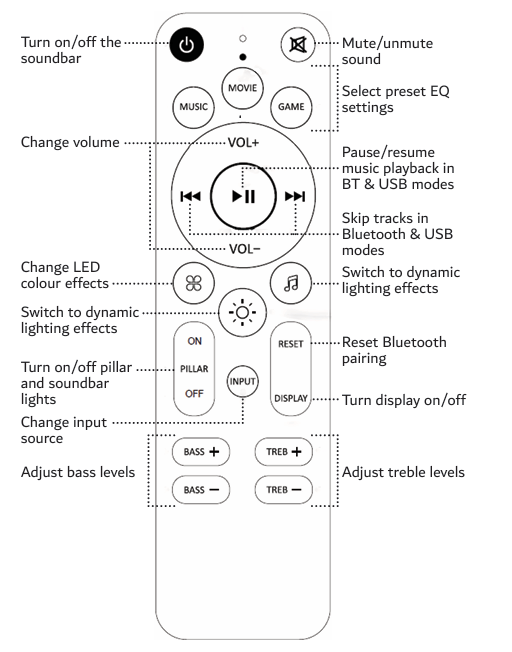
Remote control highlights
The remote lets you:
- Turn the soundbar on and off
- Mute and unmute
- Change volume
- Change LED colour effects
- Turn pillar and soundbar lights on or off
- Change input source
- Pause and resume music in Bluetooth and USB modes
- Skip tracks in Bluetooth and USB modes
- Adjust bass and treble
- Select preset EQ settings
- Reset Bluetooth pairing
- Turn the display on or off
Audio settings
You can adjust:
- Bass from -3 to +3
- Treble from -3 to +3
- Preset EQ modes:
- Music
- Movie
- Game
Common checks if there is no sound from the TV
If the soundbar is connected to the TV but there is no sound:
- Make sure the HDMI cable is connected to the TV’s HDMI ARC port
- Make sure the soundbar is set to ARC mode
- Check that CEC is turned on in the TV settings
- Check that Digital Audio Output is set to PCM
- Make sure the TV is outputting sound through HDMI ARC and not through the TV speakers
Wall mounting
The manual includes a wall-mounting diagram for this model family. If you plan to wall mount the soundbar, follow the diagram shown in the manual and ensure the mounting points are level and secure.
Specifications
Model numbers:
- GA-21CSSW-273
- SP-21CSSW-112
- SP-P21CSW-303
Bluetooth name:
- 21CS
Speaker ratings:
- Soundbar: 2 x 5W 4Ω
- Subwoofer: 20W 4Ω
Power input:
- DC 18V / 2A
Dimensions:
- Soundbar: 490 x 80 x 45 mm
- Subwoofer: 140 x 216 x 385 mm
Weight:
- Soundbar: 0.6 kg
- Subwoofer: 3.1 kg
Need more help?
For extra support, troubleshooting, or warranty help, you can check Laser support resources or use the original manual for this model family. The manual also directs customers to the Laser support site for FAQs and troubleshooting.
Was this article helpful?
That’s Great!
Thank you for your feedback
Sorry! We couldn't be helpful
Thank you for your feedback
Feedback sent
We appreciate your effort and will try to fix the article